Ubiquiti Networks UniFi AP 6 Lite
From TechInfoDepot
Jump to navigationJump to search
| abgn+ac+ax (AX1500) | |||||||||||||||||||||||||||||||||
|---|---|---|---|---|---|---|---|---|---|---|---|---|---|---|---|---|---|---|---|---|---|---|---|---|---|---|---|---|---|---|---|---|---|
| Ubiquiti Networks UniFi AP 6 Lite | |||||||||||||||||||||||||||||||||
 | |||||||||||||||||||||||||||||||||
| Homepage | Product page | ||||||||||||||||||||||||||||||||
| Wikipedia | Ubiquiti Networks | ||||||||||||||||||||||||||||||||
| WikiDevi.wi-cat.ru | Ubiquiti Networks UniFi AP 6 Lite | ||||||||||||||||||||||||||||||||
| 3rd Party Firmware | |||||||||||||||||||||||||||||||||
| dd-wrt | Status Unknown | ||||||||||||||||||||||||||||||||
| OpenWrt | Status Unknown | ||||||||||||||||||||||||||||||||
| Tomato any flavor | Incompatible | ||||||||||||||||||||||||||||||||
| Gargoyle | Status Unknown | ||||||||||||||||||||||||||||||||
| Platform | |||||||||||||||||||||||||||||||||
| Brand • Model • Rev | Ubiquiti Networks UniFi AP 6 Lite | ||||||||||||||||||||||||||||||||
| Model Part Number | U6-Lite-AP | ||||||||||||||||||||||||||||||||
| FCC ID | SWX-U6LITE | ||||||||||||||||||||||||||||||||
| Type | access point | ||||||||||||||||||||||||||||||||
CPU1  | MediaTek MT7621AT | ||||||||||||||||||||||||||||||||
| CPU1 Type | MIPS 1004Kc | ||||||||||||||||||||||||||||||||
| CPU1 Speed | 880 MHz ( 2 cores ) 16-bit | ||||||||||||||||||||||||||||||||
| Flash1 Chip | Macronix MX25L25645GMI-08G | ||||||||||||||||||||||||||||||||
| Flash1 Size | 32 MiB 33,554,432 B <br />262,144 Kib <br />32,768 KiB <br />256 Mib <br />0.0313 GiB <br /> | ||||||||||||||||||||||||||||||||
| RAM1 Size | 256 MiB 268,435,456 B <br />2,097,152 Kib <br />262,144 KiB <br />2,048 Mib <br />0.25 GiB <br /> | ||||||||||||||||||||||||||||||||
| RAM1 Chip | Nanya Model? | ||||||||||||||||||||||||||||||||
| ETH chip1 | MediaTek MT7621AT | ||||||||||||||||||||||||||||||||
| Ethernet Port Count | 1-1GbE-LAN | ||||||||||||||||||||||||||||||||
| Wired Standard | IEEE 802.3i/3u/3ab | ||||||||||||||||||||||||||||||||
|
802dot11 OUI: none specified | |||||||||||||||||||||||||||||||||
| Stock bootloader | U-Boot | ||||||||||||||||||||||||||||||||
| Expansion IF types | none specified | ||||||||||||||||||||||||||||||||
| PoE | 802.3af, standard | ||||||||||||||||||||||||||||||||
| Power | 44-57 VDC, 0.32 A | ||||||||||||||||||||||||||||||||
| Connector type | Ethernet (RJ-45) | ||||||||||||||||||||||||||||||||
| Serial Port (UART) | yes, 3.3V TTL, (115200 8N1) | ||||||||||||||||||||||||||||||||
|
Flags: | |||||||||||||||||||||||||||||||||
|
| |||||||||||||||||||||||||||||||||
| Other | |||||||||||||||||||||||||||||||||
|
| |||||||||||||||||||||||||||||||||
| 3rd Party Firmware Support |
OpenWrt • (List | Dev | DLs) | ||||||||||||||||||||||||||||||||
| Retail | |||||||||||||||||||||||||||||||||
| FCC approval date | 21 August 2020 | ||||||||||||||||||||||||||||||||
| (Est.) release date | December 2020 | ||||||||||||||||||||||||||||||||
| (Est.) initial retail price (in USD): | $99 | ||||||||||||||||||||||||||||||||
| ASIN |
B08QG92M83  | ||||||||||||||||||||||||||||||||
| Country of manuf | China | ||||||||||||||||||||||||||||||||
| Radio 1 | |||||||||||||||||||||||||||||||||
| Chip1 | MediaTek MT7603E | ||||||||||||||||||||||||||||||||
| Wireless interface OUI | none specified | ||||||||||||||||||||||||||||||||
| Antenna Connector Type | none specified | ||||||||||||||||||||||||||||||||
| MIMO status | 2x2:2 | ||||||||||||||||||||||||||||||||
| Wireless Standard | IEEE 802.11b/g/n | ||||||||||||||||||||||||||||||||
| 802.11n | up to 300 Mbps | ||||||||||||||||||||||||||||||||
| 802.11g | up to 54 Mbps | ||||||||||||||||||||||||||||||||
| 802.11b | up to 11 Mbps | ||||||||||||||||||||||||||||||||
| WiFi Operating Frequency | 2.4 GHz | ||||||||||||||||||||||||||||||||
| Radio 2 | |||||||||||||||||||||||||||||||||
| Chip1 | MediaTek MT7915AN | ||||||||||||||||||||||||||||||||
| Chip2 | MediaTek MT7975AN | ||||||||||||||||||||||||||||||||
| Wireless interface OUI | none specified | ||||||||||||||||||||||||||||||||
| Antenna Connector Type | none specified | ||||||||||||||||||||||||||||||||
| MIMO status | 2x2:2 | ||||||||||||||||||||||||||||||||
| Wireless Standard | IEEE 802.11a/n/ac/ax | ||||||||||||||||||||||||||||||||
| 802.11ax | up to 1148 Mbps | ||||||||||||||||||||||||||||||||
| 802.11ac | up to 867 Mbps | ||||||||||||||||||||||||||||||||
| 802.11n | up to 300 Mbps | ||||||||||||||||||||||||||||||||
| 802.11a | up to 54 Mbps | ||||||||||||||||||||||||||||||||
| WiFi Operating Frequency | 5 GHz | ||||||||||||||||||||||||||||||||
| |||||||||||||||||||||||||||||||||
For a list of all currently documented MediaTek chipsets with specifications, see MediaTek.
For a list of all currently documented Ubiquiti Networks devices with specifications, see Ubiquiti Networks.
Overview
Wi-Fi 6 Access Point with dual-band 2x2 MIMO in a compact design for low-profile mounting.
UniFi 6 Lite is a 2x2 Wi-Fi 6 access point that delivers up to 1.5 Gbps aggregate radio rate with 5 GHz (MU-MIMO and OFDMA) and 2.4 GHz (MIMO) radios. Mount UniFi 6 Lite horizontally in the ceiling to cover a high-density environment, or mount it vertically on the wall to extend its range. UniFi 6 Lite has a compact and nano-sized design, so it can use nanoHD covers and mounting accessories.
Links of Interest
Flashing
 | NOTE: During configuration or flashing a device, the only things that should be hooked to the device is the computer and power. |
Flashing OpenWrt
Target: ramips
Subtarget: mt7621
Package architecture: mipsel_24kc
Supported Since Commit
Support started version: 21.02.0
Current supported version: 25.12.2
Subtarget: mt7621
Package architecture: mipsel_24kc
Supported Since Commit
Support started version: 21.02.0
Current supported version: 25.12.2
WLAN Hardware: MediaTek MT7603E, MediaTek MT7915AN, MediaTek MT7975AN
WLAN Comment: ac/ax on 5 GHz only, 2x2 MIMO (300 Mbps @ 2.4 Ghz, 1201 Mbps @ 5 GHz)
Installation method(s):
See devicepage, see git-commit
Recovery method(s):
Ubiquiti TFTP, see devicepage
Recovery Comment:
Device IP might not be 192.168.1.20
WLAN Comment: ac/ax on 5 GHz only, 2x2 MIMO (300 Mbps @ 2.4 Ghz, 1201 Mbps @ 5 GHz)
Installation method(s):
See devicepage, see git-commit
Recovery method(s):
Ubiquiti TFTP, see devicepage
Recovery Comment:
Device IP might not be 192.168.1.20
| git • >> |
|---|
ramips: add support for Ubiquiti UniFi 6 Lite
Hardware
--------
MediaTek MT7621AT
256M DDR3
32M SPI-NOR
MediaTek MT7603 2T2R 802.11n 2.4GHz
MediaTek MT7915 2T2R 802.11ax 5GHz

Not Working
-----------
 - Bluetooth (connected to UART3)

UART
----

UART is located in the lower left corner of the board. Pinout is

0 - 3V3 (don't connect)
1 - RX
2 - TX
3 - GND

Console is 115200 8N1.

Boot
----

1. Connect to the serial console and connect power.

2. Double-press ESC when prompted

3. Set the fdt address

   $ fdt addr $(fdtcontroladdr)

4. Remove the signature node from the control FDT

   $ fdt rm /signature

5. Transfer and boot the OpenWrt initramfs image to the device.
   Make sure to name the file C0A80114.img and have it reachable at
   192.168.1.1/24

   $ tftpboot; bootm

Installation
------------

1. Connect to the booted device at 192.168.1.20 using username/password
   "ubnt".

2. Update the bootloader environment.

   $ fw_setenv devmode TRUE
   $ fw_setenv boot_openwrt "fdt addr \$(fdtcontroladdr);
     fdt rm /signature; bootubnt"
   $ fw_setenv bootcmd "run boot_openwrt"

3. Transfer the OpenWrt sysupgrade image to the device using SCP.

4. Check the mtd partition number for bs / kernel0 / kernel1

   $ cat /proc/mtd

5. Set the bootselect flag to boot from kernel0

   $ dd if=/dev/zero bs=1 count=1 of=/dev/mtdblock4

6. Write the OpenWrt sysupgrade image to both kernel0 as well as kernel1

   $ dd if=openwrt.bin of=/dev/mtdblock6
   $ dd if=openwrt.bin of=/dev/mtdblock7

7. Reboot the device. It should boot into OpenWrt.

Below are the original installation instructions prior to the discovery
of "devmode=TRUE". They are not required for installation and are
documentation only.

The bootloader employs signature verification on the FIT image
configurations. This way, booting unauthorized image without patching
the bootloader is not possible. Manually configuring the bootcmd in the
U-Boot envronment won't work, as this is restored to the default value
if modified.

The bootloader is made up of three different parts.

1. The SPL performing early board initialization and providing a XModem
   recovery in case the PBL is missing

2. The PBL being the primary U-Boot application and containing the
   control FDT. It is LZMA packed with a uImage header.

3. A Ubiquiti standalone U-Boot application providing the main boot
   routine as well as their recovery mechanism.

In a perfect world, we would only replace the PBL, as the SPL does not
perform checks on the PBLs integrity. However, as the PBL is in the same
eraseblock as the SPL, we need to at least rewrite both.

The bootloader will only verify integrity in case it has a "signature"
node in it's control device-tree. Renaming the signature node to
something else will prevent this from happening.

Warning: These instructions are based on the firmware intially
shipped with the device and potentially brick your device in a way it
can only be recovered using a SPI flasher.

Only (!) proceed if you understand this!

1. Extract the bootloader from the U-Boot partition using the OpenWrt
   initramfs image.

2. Split the bootloader into it's 3 components:

   $ dd if=bootloader.bin of=spl.bin bs=1 skip=0 count=45056
   $ dd if=bootloader.bin of=pbl.uimage bs=1 skip=45056 count=143360
   $ dd if=bootloader.bin of=ubnt.uimage bs=1 skip=188416

3. Strip the uImage header from the PBL

   $ dd if=pbl.uimage of=pbl.lzma bs=64 skip=1

4. Decompress the PBL

   $ lzma -d pbl.lzma --single-stream

   The decompressed PBL sha256sum should be
   d8b406c65240d260cf15be5f97f40c1d6d1b6e61ec3abed37bb841c90fcc1235

5. Open the decompressed PBL using your favorite hexeditor. Locate the
   control FDT at offset 0x4CED0 (0xD00DFEED). At offset 0x4D5BC, the
   label for the signature node is located. Rename the "signature"
   string at this offset to "signaturr".

   The patched PBL sha256sum should be
   d028e374cdb40ba44b6e3cef2e4e8a8c16a3b85eb15d9544d24fdd10eed64c97

6. Compress the patched PBL

   $ lzma -z pbl --lzma1=dict=67108864

   The resulting pbl.lzma file should have the sha256sum
   7ae6118928fa0d0b3fe4ff81abd80ecfd9ba2944cb0f0a462b6ae65913088b42

7. Create the PBL uimage

   $ SOURCE_DATE_EPOCH=1607909492 mkimage -A mips -O u-boot -C lzma
     -n "U-Boot 2018.03 [UniFi,v1.1.40.71]" -a 84000000 -e 84000000
     -T firmware -d pbl.lzma patched_pbl.uimage

   The resulting patched_pbl.uimage should have the sha256sum
   b90d7fa2dcc6814180d3943530d8d6b0d6a03636113c94e99af34f196d3cf2ce

8. Reassemble the complete bootloader

   $ dd if=patched_pbl.uimage of=aligned_pbl.uimage bs=143360 count=1
     conv=sync
   $ cat spl.bin > patched_uboot.bin
   $ cat aligned_pbl.uimage >> patched_uboot.bin
   $ cat ubnt.uimage >> patched_uboot.bin

   The resulting patched_uboot.bin should have the sha256sum
   3e1186f33b88a525687285c2a8b22e8786787b31d4648b8eee66c672222aa76b

9. Transfer your patched bootloader to the device. Also install the
   kmod-mtd-rw package using opkg and load it.

   $ insmod mtd-rw.ko i_want_a_brick=1

   Write the patched bootloader to mtd0

   $ mtd write patched_uboot.bin u-boot

10. Erase the kernel1 partition, as the bootloader might otherwise
    decide to boot from there.

    $ mtd erase kernel1

11. Transfer the OpenWrt sysupgrade image to the device and install
    using sysupgrade.

FIT configurations
------------------

In the future, the MT7621 UniFi6 family can be supported by a single
OpenWrt image.

config@1: U6 Lite
config@2: U6 IW
config@3: U6 Mesh
config@4: U6 Extender
config@5: U6 LR-EA (Early Access - GA is MT7622)
|
Pictures
-
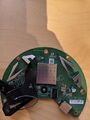 obverse
 -
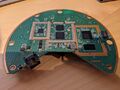 reverse below
 -
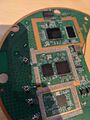 reverse antenna conn
 -
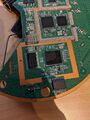 CPU, RAM, Storage


See also
- SWX-U6EP (2021-08-05) Digital Transmission Radio
- SWX-U6MESHR (2021-06-18) Digital Transmission Radio
- SWX-U6PROR (2021-05-11) Digital Transmission Radio *
- SWX-U6LRR (2021-03-26) Digital Transmission Radio
- SWX-U6PRO (2020-11-11) Digital Transmission Radio
- SWX-U6LITE (2020-08-21) UniFi U6 Lite
- SWX-U6EXT (2020-07-30) Digital Transmission Radio
- SWX-U6MESH (2020-06-23) Digital Transmission Radio
- SWX-U6LR (2020-05-20) Digital Transmission Radio
- SWX-U6IW (2020-05-18) Digital Transmission Radio
Models
- Ubiquiti Networks UniFi AP 6 Lite (U6-Lite)
- Ubiquiti Networks UniFi AP 6 Plus (U6-Plus)
- Ubiquiti Networks UniFi AP 6 Pro (U6-Pro)
- Ubiquiti Networks UniFi AP 7 Pro (U7-Pro)
- Ubiquiti Networks UniFi AP 7 Pro Max (U7-Pro-Max)
Categories:
- Ubiquiti Networks
- Embedded system/access point
- Embedded System MediaTek
- Embedded System MT7621AT
- MediaTek
- Embedded System MIPS 1004Kc
- Embedded System
- OpenWrt Supported
- Embedded System MT7603E
- Has Mimo Status
- Embedded System IEEE 802.11b/g/n
- Embedded System MT7915AN
- Embedded System MT7975AN
- Embedded System IEEE 802.11a/n/ac/ax
- Dual-Radio Wireless Embedded System
- Wireless Embedded System
- Dual-Band
- English Documentation


